Randy Charles is the owner of PaintCentric.com, a website dedicated to providing information, tips, tricks, and news about all things paint. With over 10 years...Read more
In a world where car paint job technology is taking center stage for automobiles, most car owners find it appealing to give their car a new look with color-changing paint.
Two of the biggest contenders for this are chameleon paint and electroluminescent (aka paramagnetic) paint.
While chameleon paint has an iridescent finish that changes color based on the angle it is viewed. On the other hand, paramagnetic paint changes color as light or electricity passes through it.
So what are the color-changing paint job costs, and can I do it myself?
With several factors involved, you should get paint jobs within the range of $5,000 to $7,000, but they can cost up to $10,000. You will need about 100 grams of paramagnetic pigment, catalyst, and reducer, plus the labor cost.
The materials prices should be between $1,000 to $2,500, and the labor should be within the same range because it takes two or more weeks to complete the task.
Note that costs increase with the addition, level, or variety of materials. Adding pearl, smoke, or matte finishes can also increase the cost.
What is Paramagnetic Paint?
The color-changing effect of the paramagnetic paint is due to an electric current operating on the iron oxide particles by adjusting the spacing between the crystals to affect the ability to reflect light and change color. This means you can change the color of your car using special paint and electrical devices.
Is Paramagnetic Paint Real?
People often refer to Paramagnetic Paint as fake because it is not a color-changing paint but a light-emitting coating that emits light when a certain current passes through it to give different colors. Electroluminescent paint is a more proper term, but people use both.
Despite being referred to as fake, a car with paramagnetic paint will sell higher than regular paint.
Can You Make Your Paramagnetic Paint?
Have you ever considered that you can make your paramagnetic paint? Use the guidelines below to make your paramagnetic paint instead of getting an expert to do the task for you.

Note: You should follow the instructions below on a trial project. The outcome will let you know the ratio of the ingredient you need for a more significant project such as cars.
Now, let us go through the steps below!
Precaution
- Read all the safety instructions from the materials you gather for the task.
- Use caution with the high voltage AC involved, as it is easy to electrocute yourself if you don’t take care.
- Ensure you have all your protective equipment available and in working order.
- Store all tools, especially the chemicals, in a safe place.
Gather All Essential Materials
You will surely find it challenging to make paramagnetic paint without suitable materials.

Tools
- Nitrile gloves of which the Salon World Safety Black Nitrile Disposable Gloves are the preferred choices with 100 pieces in a box. These are highly resistant to chemicals to some degree.
- KN95 Face Mask 50 Pack is another essential material because the powder you are using for the project is super fine and can be inhaled if not protected.
- Eye protection and eyewash
- Multimeter (OWUYUXI is best for the task)
- Paint brushes of different sizes
- Heat gun — like the SEEK ONE Heat Gun
- DC to AC inverter
- Glass jar
- A rotary tool that comes with a stirring attachment
- UV blacklight
- 9-12 batteries
Paint additives
- Water-based clear coat polyurethane paint: You will have to mix all your additives with the paint, so you can get it in larger quantities depending on the task you have at hand.
- Electroluminescent Phosphor: An essential material with no alternative for an effective result. Unfortunately, it is expensive.
- Barium titanate: Dielectric additive, and it is essential for the process.
- Copper paint: Used for the base layer only, and it is highly conductive
- Peridot, double-sided copper tape, silver nanowires, and any other conductive substrate:They are expensive and electrically conductive to give a transparent appearance when appropriately applied.
Also Read: How much does a bob ross painting cost?
Applying The Base Conductive Layer
For our trial case, use a piece of paper. Once you achieve the effect you’re going for on paper; you can use the same method on your car once you get the desired result.
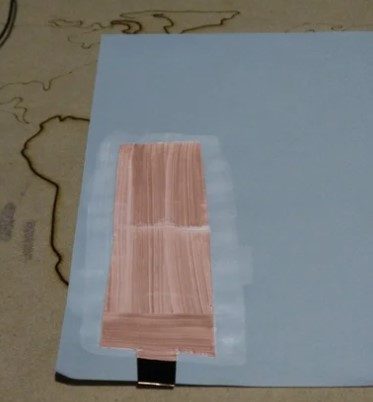
Get the conformal copper paint and apply it to the paper in a rectangular form. You should ensure the thickness is not more than 1mm.

The base you have should give a rough outline of the Electroluminescent light-up area. Now, you should extend a tail from the rectangular area you just painted. It is the point where you have to connect the inverter to the base layer.
Use the heat gun and apply it to the base layer to gently dry the surface and then allow it to cool. Avoid overheating as the paint will crack/boil and only give partial illumination.
You need to test the resistance of the base layer, and you can do that using the multimeter. The goal is to get a resistance of less than 1 ohm over the base layer area.
Applying The Insulator

- The next step is for you to apply the insulator. The ratio of the Barium Titanate to the polyurethane paint should be 19.1g to 80.9g.
- First, you should check the base layer and ensure it is dry.
- Apply a thick layer of Dielectric paint over the base layer. You should ensure the paint extends out over the edges of the base layer to get it fully insulated while you leave out the tail area.
- Get the heat gun to dry the lay gently and ensure the temperature does not overheat.
- Connect the multimeter to the tail; this time, you should not get a reading because the layer is insulated.
Apply Phosphor


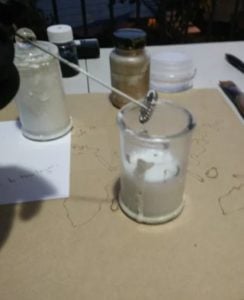
- Mix the Phosphor with the polyurethane paint with a 30g to 70g.
- Use the rotary tool and UV light to mix the paints thoroughly.
- Apply the paint to the Dielectric layer you have on the paper.
- Use the UV light to check that you have an even dispersion across the light area.
- Now, you can use your heat gun to dry the layer gently, careful not to overheat the area.
Apply The Top Electrode Layer

- Use of the PEDOT for this stage.
- You need to ensure that the layer of the paint is very dry before applying.
- Apply the top electrode to the paint.
- Allow the layer to dry off before you move to the next step.
Apply Bus Bar
The primary role of the bus bar is to ensure an even application of electricity on the whole of the lamp. You must apply the bus bar and ensure it touches all areas you have the PEDOT on. It is the section where you have to connect the light.

Apply Light
You should apply light to the two electrodes you have through wires and battery, and then you get to see the wonders of your work.

After you achieve an optimal trial run, it’s time to apply it to your car. Make sure the vehicle is cleaned of dirt and rust.
How Much Does Paramagnetic Paint Cost?
The cost of paramagnetic paint on a car varies with lots of factors contributing to it. If you go through the procedure above on making paramagnetic paint, you will see that it requires a lot of materials. Those materials do not come cheap, and some require that you use larger quantities.
A budget of $3,000 and above for the materials is considered alongside the labor payment. The labor payment depends on the company or individual involved, and it is never cheap because of the nature of the work. It typically can bring the total up to approximately $5,000 or more.
Related: How Much Does It Cost to Paint a Chevy Tahoe?
What Color Is Paramagnetic Paint?
Paramagnetic paint is made available in many different car paint colors. The pigments include aqua, green, orange, pink, blue, yellow, and white.
How Do You Paint Paramagnetic Paint?
Getting your car to the painter can be expensive, so you can always try to do it yourself. Let us check out some of the things you can do using LitCoat. Lumilor paint jobs are another popular name in electroluminescent systems.
Get the LitCoat, as it is the power remittance layer. This first layer will connect with your power source. So, you must leave a small connection opening for it.
The second LitCoat or Dielectric layer is the insulation and forms the capacitance.
The third is the pigment layer, which is the point where the paint gets its pigment and light emittance.
The fourth LitCoat is required for another layer to complete the connection.
You need to apply all four layers to the car. You can then go ahead to use LitCoat of one color. You should overlay the color with a few other colors and repeat the process until you get your desired color. To round it off, you can add a clear sealing coat, such as polish or gloss, depending on your preference.
How Long Does Paramagnetic Paint Last?
The paramagnetic paint’s longevity depends on the paint you get and the painting process. However, paramagnetic paint has a shelf life of 3 months to a year. Some factors, such as climate, hardened washers, and improper maintenance, can shorten the paint’s lifespan.
You can always extend the paint’s lifespan if you consider your climate condition, use safe and light washers, and cover the car often to protect the paint layers.
Also Read: How Much Does Vantablack Paint Cost?
Conclusion
We have you covered here if you want to know how much paramagnetic paint costs. The price is never low because you have to spend thousands of dollars. The cost of materials is expensive, and the process is never easy, so the pricing for it is also high.
However, if you have the financial capacity, color-changing paint on your car will cost $2,000 to $6,000.
Related Resources:
- Living Room Painting Cost
- How much does it cost to paint rims
- How Much Does It Cost to Rhino Line a Whole Truck?

Randy Charles is the owner of PaintCentric.com, a website dedicated to providing information, tips, tricks, and news about all things paint. With over 10 years of experience in the painting industry, Randy has become an expert in the field and is passionate about helping others learn more about painting. He has written numerous articles on the subject and is committed to providing accurate and up-to-date information to his readers.
